- Create a registration form
- Modify a registration form
- List selection
- Share my form

1. Create a registration form
To add a new sender, click on "Add a sender "To get started, click on the "create a new subscription form" button.
Give your form a name so that you can easily manage and track it on your account.
2. Modifying a Subscription Form
Many customization options are available to you. You can indeed modify :
- The background
- Text fonts, sizes and colors
- The form fields (add as many fields as you want)
- Instruction text (which tells users how to register)
- The confirmation message (indicating to the user that his registration is validated)
New types of form fields
- Add form fields to collect information about your subscribers and populate existing contact attributes (such as text, number, date, category, or Boolean values).
- Add an opt-in confirmation to your form to record your subscribers' consent to receive your newsletters and promotional emails.
- You can also add a multi-list registration field to allow your contacts to declare their areas of interest and preferences during registration and place them in the corresponding lists.
Each new form field corresponds to a contact attribute or contact list :
- Text (contact attribute)
- Number (contact attribute)
- Date (contact attribute)
- Multi-list registration (contact list)
- Double opt-in (contact attribute)
2.2 Customizing the form
You can drag and drop various blocks of elements such as a title, text, image or separator to your form in the same way as you can add fields to the form.

You can customize :
- The background color or image
- Text style, format, color and size, as well as alignment of a title, text, label and help text
- The background, layout, width, alignment, borders, opacity and corners of a container
- The font style, size, format and color of the text of a button, as well as the color, alignment and angles of a button
- The font style, format, color, size, and alignment of the text of a confirmation/error message, as well as the background color, border color, and corners of the message
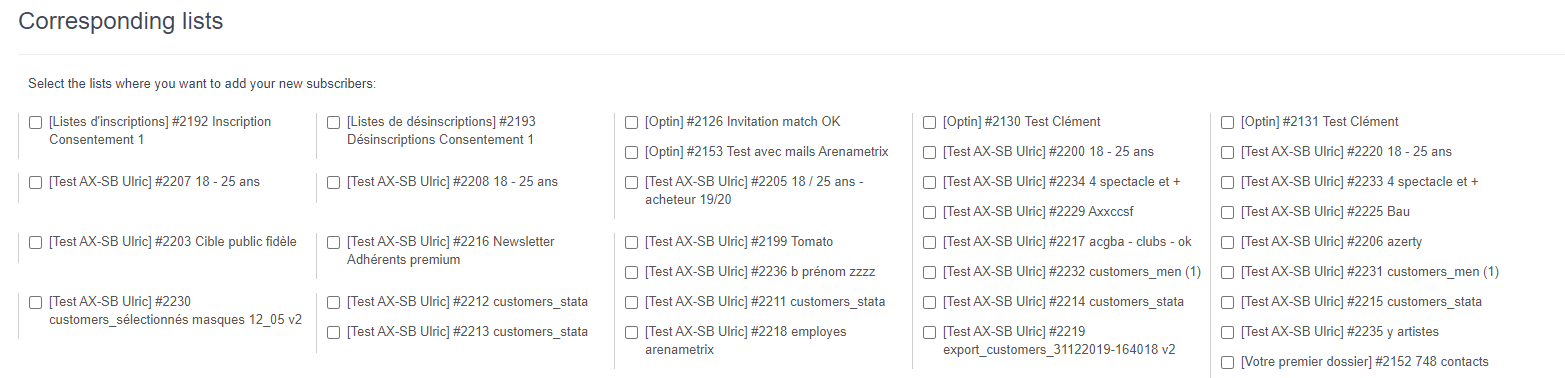
3. List selection
When you have finished modifying the appearance of your form, select the list(s) where your new contacts will be stored after validation of the form.
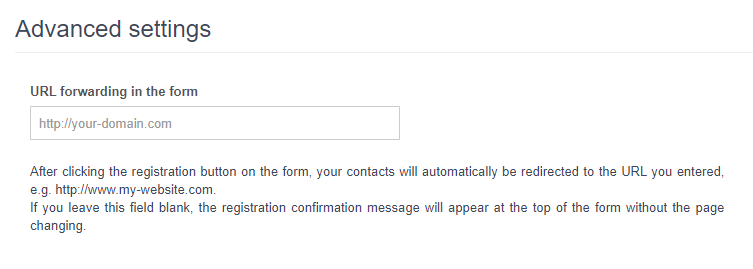
After you click on the register button on the form, your contacts will be automatically redirected to the URL you entered, such as http://www.mon-site-web.com, or to a confirmation page. If you do not select a URL or a confirmation page, a registration confirmation message will be displayed at the top of the form without changing the page. To set up a redirect URL, enter your website url in Redirect URL in the form.
4. Share my form
After you save your form, you can share it and get a code to embed the form on your website or a link for quick sharing.
There are three types of code:
- Iframe: easy to set up, this code allows you to integrate the form into your website.
- form to a pop-up or a page on your website.
- HTML: this code gives you much more possibilities to customization, such as Ajax-like animations for messages.
- simple HTML: this simplified version of the HTML code of the form does not requires no JavaScript request.
Good to know: this form code cannot include any Captcha that requires a JavaScript request. Finally, paste the code into your website to display the form.